TL;DR
verzweiflung (GitHub) is a highly pragmatic solution to packet loss in China (and other places) as well as sharing bandwidth with other users altogether – though at a cost.
A class based system
About three years ago my employer started sending me to China, a magical place where the internet is strangely different. Besides not being able to reach some services like Google, which is quite interesting in itself, I discovered the classes of Chinese internet. For example, China’s leading telecommunications provider, China Telecom, offers ChinaNet and CN2. Domestically, ChinaNet is most sold. In its blend there’s a generous amount of domestic bandwidth with a hint of foreign traffic – just enough to justify calling it “internet”. CN2 is essentially the real deal, minus what the Great Firewall protects your mind from. Sadly, though, it’s hard to obtain and you’ll never see it in public places. (All public WiFi is ChinaNet.) Unlike its premium version, ChinaNet has high to extreme packet loss to Western locations. (I’ve regularly seen >40%.) This is actually really effective in convincing people to switch to domestic services – you simply can’t rely on anything else. Analysing the connection further I noticed that the loss was mostly asymmetric – inbound traffic often was extremely lossy, while outbound was better by about an order of magnitude. I assume the actual links are symmetric, but the Western interest in Chinese content isn’t great.
All TCP connections are equal…
Piecing together the whole picture, I was both baffled and somewhat intrigued at the same time. Packet loss isn’t something you often have to deal with these days, and if you do it’s usually something you can fix. Though as a foreigner in China their peerings and upstream providers are utterly out of reach. After ruminating about the issue for days, I concluded playing by the rules wouldn’t get me any further. I remembered TCP/IP congestion avoidance back at university, and how exponential back-off seriously impacts throughput in the presence of loss. It is supposed to be the internet’s egalitarian solution to packet loss – everyone slows down to the same speed in order to collectively minimise loss. So, naturally, I hacked the Linux TCP stack to get rid of it. The story could have ended here, but sadly I didn’t see the results I was hoping for. With TCP stalling and retransmitting packets at 350ms roundtrip latency and 50% loss, it still slowed to a crawl.
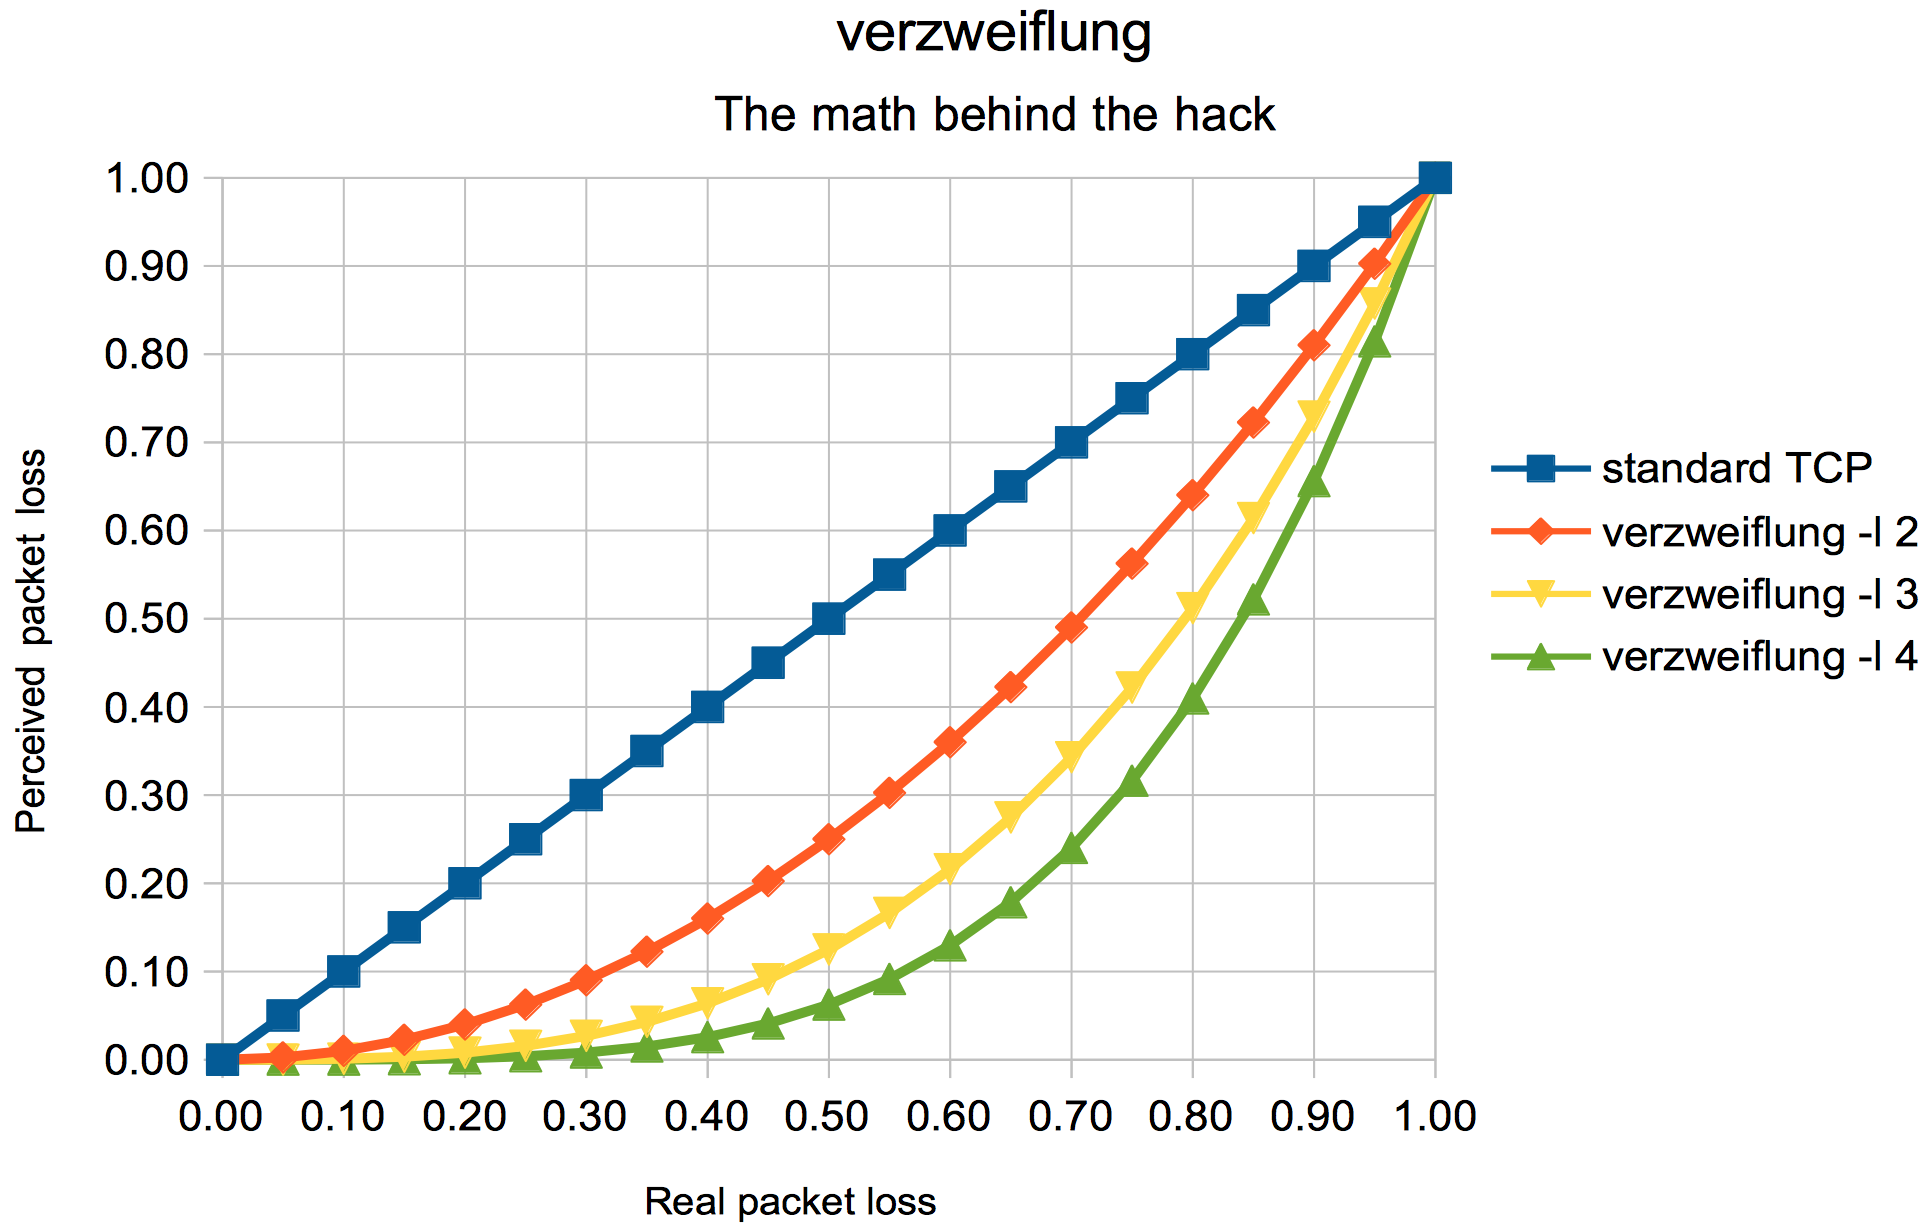
The diminishing returns of different levels of verzweiflung.
The Nuclear Option
After watching SSH connections time out one too many times, verzweiflung (the German version of despair) set in. I knew that unlike dropped packets, duplicate packets wouldn’t do any harm to TCP connections, though they can seamlessly take the place of a preceding dropped packet. Sending every packet twice at 50% loss results in only a 25% chance for both to be dropped, that’s 12.5% if you send them thrice and so on. Some quickly stitched together iptables rules confirmed my theory. This time it looked promising! Initially the results were still a bit worse than the math would suggest, which was caused by short loss spikes. But once I started mixing the packets in time I got a close match. In honour of its origin, I named my work verzweiflung.
One man’s loss is another man’s gain
The more I started playing with verzweiflung, the more I realised that I got way more than I bargained for. SSH connections were finally reasonably stable, SFTP was pushing several megabits a second again, but the real surprise was how it affected other things. I shared it with my colleagues and they noticed how communicating with verzweiflung in a crowded public WiFi resulted in considerably better speeds, while having everyone else come second. One of my friends reported his 25 Mbps connection turned into what felt like dial-up, when he ran a backup of one of my servers. (Oops.) Given enough bandwidth verzweiflung oversaturates your link way beyond where loss starts, meanwhile its redundancy chips in for what gets lost. And while verzweiflung thrives in a lossy environment, everything else backs off. It’s win-win, except for everyone else, for them it’s more like lose-lose. But that just turned into somebody else’s problem.
And why all of this is a really bad idea
verzweiflung is a prime real life example of the tragedy of the commons, the more people use it, the less effective it becomes. And in the end, everyone is dependent on it, wasting huge amounts of traffic, for less total throughput than before. And last but not least, verzweiflung actively violates internet standards – which is bad.